Loading map...
{"minzoom":false,"maxzoom":false,"mappingservice":"leaflet","width":"auto","height":"600px","centre":{"text":"","title":"","link":"","lat":51.277168,"lon":0.507651,"icon":""},"title":"","label":"","icon":"","lines":[],"polygons":[],"circles":[],"rectangles":[],"copycoords":false,"static":false,"zoom":false,"defzoom":14,"layers":["OpenStreetMap","Esri.WorldImagery"],"image layers":[],"overlays":[],"resizable":false,"fullscreen":true,"scrollwheelzoom":true,"cluster":false,"clustermaxzoom":20,"clusterzoomonclick":true,"clustermaxradius":1,"clusterspiderfy":true,"geojson":"","clicktarget":"","imageLayers":[],"locations":[{"text":"\u003Cb\u003E\u003Cdiv class=\"mw-parser-output\"\u003E\u003Cp\u003E\u003Ca href=\"/northfleet-kilns\" title=\"northfleet-kilns\"\u003ENorthfleet Kilns\u003C/a\u003E\u003C/b\u003E\u003Cdiv class=\"mw-parser-output\"\u003E\u003Cp\u003E\u003Ca href=\"/Category:factories-and-storage\" title=\"Category:factories-and-storage\"\u003EFactories and Storage\u003C/a\u003E, \u003Ca href=\"/Category:civil-defence\" title=\"Category:civil-defence\"\u003ECivil Defence\u003C/a\u003E, \u003Ca href=\"/Category:transport\" title=\"Category:transport\"\u003ETransport\u003C/a\u003E\n\u003C/p\u003E\u003C/div\u003E","title":"Northfleet Kilns@Factories and Storage, Civil Defence, Transport\n","link":"","lat":51.448,"lon":0.329,"icon":"/images/4/40/m_factories-and-storage.png"},{"text":"\u003Cb\u003E\u003Cdiv class=\"mw-parser-output\"\u003E\u003Cp\u003E\u003Ca href=\"/hollingbourne-zero-station-auxiliary-units\" title=\"hollingbourne-zero-station-auxiliary-units\"\u003EHollingbourne Zero Station (Auxiliary Units)\u003C/a\u003E\u003C/b\u003E\u003Cdiv class=\"mw-parser-output\"\u003E\u003Cp\u003E\u003Ca href=\"/Category:military-land\" title=\"Category:military-land\"\u003EMilitary - Land\u003C/a\u003E\n\u003C/p\u003E\u003C/div\u003E","title":"Hollingbourne Zero Station (Auxiliary Units)@Military - Land\n","link":"","lat":51.269,"lon":0.671,"icon":"/images/2/2c/m_military-land.png"},{"text":"\u003Cb\u003E\u003Cdiv class=\"mw-parser-output\"\u003E\u003Cp\u003E\u003Ca href=\"/sheppey-harty-ferry-air-raid-shelter\" title=\"sheppey-harty-ferry-air-raid-shelter\"\u003ESheppey Harty Ferry Air Raid Shelter\u003C/a\u003E\u003C/b\u003E\u003Cdiv class=\"mw-parser-output\"\u003E\u003Cp\u003E\u003Ca href=\"/Category:civil-defence\" title=\"Category:civil-defence\"\u003ECivil Defence\u003C/a\u003E\n\u003C/p\u003E\u003C/div\u003E","title":"Sheppey Harty Ferry Air Raid Shelter@Civil Defence\n","link":"","lat":51.356,"lon":0.892,"icon":"/images/c/c5/m_civil-defence.png"},{"text":"\u003Cb\u003E\u003Cdiv class=\"mw-parser-output\"\u003E\u003Cp\u003E\u003Ca href=\"/brookland-roc-post\" title=\"brookland-roc-post\"\u003EBrookland ROC Post\u003C/a\u003E\u003C/b\u003E\u003Cdiv class=\"mw-parser-output\"\u003E\u003Cp\u003E\u003Ca href=\"/Category:nuclear-monitoring-posts\" title=\"Category:nuclear-monitoring-posts\"\u003ENuclear Monitoring Posts\u003C/a\u003E\n\u003C/p\u003E\u003C/div\u003E","title":"Brookland ROC Post@Nuclear Monitoring Posts\n","link":"","lat":50.994,"lon":0.832,"icon":"/images/4/4c/m_nuclear-monitoring-posts.png"},{"text":"\u003Cb\u003E\u003Cdiv class=\"mw-parser-output\"\u003E\u003Cp\u003E\u003Ca href=\"/grain-fort\" title=\"grain-fort\"\u003EGrain Fort\u003C/a\u003E\u003C/b\u003E\u003Cdiv class=\"mw-parser-output\"\u003E\u003Cp\u003E\u003Ca href=\"/Category:military-land\" title=\"Category:military-land\"\u003EMilitary - Land\u003C/a\u003E\n\u003C/p\u003E\u003C/div\u003E","title":"Grain Fort@Military - Land\n","link":"","lat":51.458,"lon":0.721,"icon":"/images/2/2c/m_military-land.png"},{"text":"\u003Cb\u003E\u003Cdiv class=\"mw-parser-output\"\u003E\u003Cp\u003E\u003Ca href=\"/coldblow-ace-high-relay-station\" title=\"coldblow-ace-high-relay-station\"\u003EColdblow Ace High Relay Station\u003C/a\u003E\u003C/b\u003E\u003Cdiv class=\"mw-parser-output\"\u003E\u003Cp\u003E\u003Ca href=\"/Category:radar\" title=\"Category:radar\"\u003ERadar\u003C/a\u003E\n\u003C/p\u003E\u003C/div\u003E","title":"Coldblow Ace High Relay Station@Radar\n","link":"","lat":51.296,"lon":0.615,"icon":"/images/e/ef/m_radar.png"},{"text":"\u003Cb\u003E\u003Cdiv class=\"mw-parser-output\"\u003E\u003Cp\u003E\u003Ca href=\"/chatham-southern-water-emergency-control-centre\" title=\"chatham-southern-water-emergency-control-centre\"\u003EChatham Southern Water Emergency Control Centre\u003C/a\u003E\u003C/b\u003E\u003Cdiv class=\"mw-parser-output\"\u003E\u003Cp\u003E\u003Ca href=\"/Category:nuclear-bunkers\" title=\"Category:nuclear-bunkers\"\u003ENuclear Bunkers\u003C/a\u003E, \u003Ca href=\"/Category:sewers-sanitation-and-water\" title=\"Category:sewers-sanitation-and-water\"\u003ESewers, Sanitation and Water\u003C/a\u003E\n\u003C/p\u003E\u003C/div\u003E","title":"Chatham Southern Water Emergency Control Centre@Nuclear Bunkers, Sewers, Sanitation and Water\n","link":"","lat":51.337,"lon":0.613,"icon":"/images/d/d0/m_nuclear-bunkers.png"},{"text":"\u003Cb\u003E\u003Cdiv class=\"mw-parser-output\"\u003E\u003Cp\u003E\u003Ca href=\"/hoo-fort\" title=\"hoo-fort\"\u003EHoo Fort\u003C/a\u003E\u003C/b\u003E\u003Cdiv class=\"mw-parser-output\"\u003E\u003Cp\u003E\u003Ca href=\"/Category:military-land\" title=\"Category:military-land\"\u003EMilitary - Land\u003C/a\u003E\n\u003C/p\u003E\u003C/div\u003E","title":"Hoo Fort@Military - Land\n","link":"","lat":51.403,"lon":0.582,"icon":"/images/2/2c/m_military-land.png"},{"text":"\u003Cb\u003E\u003Cdiv class=\"mw-parser-output\"\u003E\u003Cp\u003E\u003Ca href=\"/darnley-mausoleum\" title=\"darnley-mausoleum\"\u003EDarnley Mausoleum\u003C/a\u003E\u003C/b\u003E\u003Cdiv class=\"mw-parser-output\"\u003E\u003Cp\u003E\u003Ca href=\"/Category:places-to-visit\" title=\"Category:places-to-visit\"\u003EPlaces To Visit\u003C/a\u003E, \u003Ca href=\"/Category:religious-and-burial\" title=\"Category:religious-and-burial\"\u003EReligious and Burial\u003C/a\u003E\n\u003C/p\u003E\u003C/div\u003E","title":"Darnley Mausoleum@Places To Visit, Religious and Burial\n","link":"","lat":51.389,"lon":0.434,"icon":"v_places-to-visit.png"},{"text":"\u003Cb\u003E\u003Cdiv class=\"mw-parser-output\"\u003E\u003Cp\u003E\u003Ca href=\"/tenterden-roc-post\" title=\"tenterden-roc-post\"\u003ETenterden ROC Post\u003C/a\u003E\u003C/b\u003E\u003Cdiv class=\"mw-parser-output\"\u003E\u003Cp\u003E\u003Ca href=\"/Category:nuclear-monitoring-posts\" title=\"Category:nuclear-monitoring-posts\"\u003ENuclear Monitoring Posts\u003C/a\u003E\n\u003C/p\u003E\u003C/div\u003E","title":"Tenterden ROC Post@Nuclear Monitoring Posts\n","link":"","lat":51.082,"lon":0.673,"icon":"/images/4/4c/m_nuclear-monitoring-posts.png"},{"text":"\u003Cb\u003E\u003Cdiv class=\"mw-parser-output\"\u003E\u003Cp\u003E\u003Ca href=\"/rodmersham-green-roc-post\" title=\"rodmersham-green-roc-post\"\u003ERodmersham Green ROC Post\u003C/a\u003E\u003C/b\u003E\u003Cdiv class=\"mw-parser-output\"\u003E\u003Cp\u003E\u003Ca href=\"/Category:nuclear-monitoring-posts\" title=\"Category:nuclear-monitoring-posts\"\u003ENuclear Monitoring Posts\u003C/a\u003E\n\u003C/p\u003E\u003C/div\u003E","title":"Rodmersham Green ROC Post@Nuclear Monitoring Posts\n","link":"","lat":51.319,"lon":0.724,"icon":"/images/4/4c/m_nuclear-monitoring-posts.png"},{"text":"\u003Cb\u003E\u003Cdiv class=\"mw-parser-output\"\u003E\u003Cp\u003E\u003Ca href=\"/rainham-kent-roc-post\" title=\"rainham-kent-roc-post\"\u003ERainham (Kent) ROC Post\u003C/a\u003E\u003C/b\u003E\u003Cdiv class=\"mw-parser-output\"\u003E\u003Cp\u003E\u003Ca href=\"/Category:nuclear-monitoring-posts\" title=\"Category:nuclear-monitoring-posts\"\u003ENuclear Monitoring Posts\u003C/a\u003E\n\u003C/p\u003E\u003C/div\u003E","title":"Rainham (Kent) ROC Post@Nuclear Monitoring Posts\n","link":"","lat":51.351,"lon":0.611,"icon":"/images/4/4c/m_nuclear-monitoring-posts.png"},{"text":"\u003Cb\u003E\u003Cdiv class=\"mw-parser-output\"\u003E\u003Cp\u003E\u003Ca href=\"/pluckley-roc-post\" title=\"pluckley-roc-post\"\u003EPluckley ROC Post\u003C/a\u003E\u003C/b\u003E\u003Cdiv class=\"mw-parser-output\"\u003E\u003Cp\u003E\u003Ca href=\"/Category:nuclear-monitoring-posts\" title=\"Category:nuclear-monitoring-posts\"\u003ENuclear Monitoring Posts\u003C/a\u003E\n\u003C/p\u003E\u003C/div\u003E","title":"Pluckley ROC Post@Nuclear Monitoring Posts\n","link":"","lat":51.18,"lon":0.748,"icon":"/images/4/4c/m_nuclear-monitoring-posts.png"},{"text":"\u003Cb\u003E\u003Cdiv class=\"mw-parser-output\"\u003E\u003Cp\u003E\u003Ca href=\"/penshurst-roc-post\" title=\"penshurst-roc-post\"\u003EPenshurst ROC Post\u003C/a\u003E\u003C/b\u003E\u003Cdiv class=\"mw-parser-output\"\u003E\u003Cp\u003E\u003Ca href=\"/Category:nuclear-monitoring-posts\" title=\"Category:nuclear-monitoring-posts\"\u003ENuclear Monitoring Posts\u003C/a\u003E\n\u003C/p\u003E\u003C/div\u003E","title":"Penshurst ROC Post@Nuclear Monitoring Posts\n","link":"","lat":51.202,"lon":0.183,"icon":"/images/4/4c/m_nuclear-monitoring-posts.png"},{"text":"\u003Cb\u003E\u003Cdiv class=\"mw-parser-output\"\u003E\u003Cp\u003E\u003Ca href=\"/linton-roc-post\" title=\"linton-roc-post\"\u003ELinton ROC Post\u003C/a\u003E\u003C/b\u003E\u003Cdiv class=\"mw-parser-output\"\u003E\u003Cp\u003E\u003Ca href=\"/Category:nuclear-monitoring-posts\" title=\"Category:nuclear-monitoring-posts\"\u003ENuclear Monitoring Posts\u003C/a\u003E\n\u003C/p\u003E\u003C/div\u003E","title":"Linton ROC Post@Nuclear Monitoring Posts\n","link":"","lat":51.231,"lon":0.525,"icon":"/images/4/4c/m_nuclear-monitoring-posts.png"},{"text":"\u003Cb\u003E\u003Cdiv class=\"mw-parser-output\"\u003E\u003Cp\u003E\u003Ca href=\"/hamstreet-roc-post\" title=\"hamstreet-roc-post\"\u003EHamstreet ROC Post\u003C/a\u003E\u003C/b\u003E\u003Cdiv class=\"mw-parser-output\"\u003E\u003Cp\u003E\u003Ca href=\"/Category:nuclear-monitoring-posts\" title=\"Category:nuclear-monitoring-posts\"\u003ENuclear Monitoring Posts\u003C/a\u003E\n\u003C/p\u003E\u003C/div\u003E","title":"Hamstreet ROC Post@Nuclear Monitoring Posts\n","link":"","lat":51.064,"lon":0.863,"icon":"/images/4/4c/m_nuclear-monitoring-posts.png"},{"text":"\u003Cb\u003E\u003Cdiv class=\"mw-parser-output\"\u003E\u003Cp\u003E\u003Ca href=\"/farningham-roc-post\" title=\"farningham-roc-post\"\u003EFarningham ROC Post\u003C/a\u003E\u003C/b\u003E\u003Cdiv class=\"mw-parser-output\"\u003E\u003Cp\u003E\u003Ca href=\"/Category:nuclear-monitoring-posts\" title=\"Category:nuclear-monitoring-posts\"\u003ENuclear Monitoring Posts\u003C/a\u003E\n\u003C/p\u003E\u003C/div\u003E","title":"Farningham ROC Post@Nuclear Monitoring Posts\n","link":"","lat":51.381,"lon":0.202,"icon":"/images/4/4c/m_nuclear-monitoring-posts.png"},{"text":"\u003Cb\u003E\u003Cdiv class=\"mw-parser-output\"\u003E\u003Cp\u003E\u003Ca href=\"/edenbridge-roc-post\" title=\"edenbridge-roc-post\"\u003EEdenbridge ROC Post\u003C/a\u003E\u003C/b\u003E\u003Cdiv class=\"mw-parser-output\"\u003E\u003Cp\u003E\u003Ca href=\"/Category:nuclear-monitoring-posts\" title=\"Category:nuclear-monitoring-posts\"\u003ENuclear Monitoring Posts\u003C/a\u003E\n\u003C/p\u003E\u003C/div\u003E","title":"Edenbridge ROC Post@Nuclear Monitoring Posts\n","link":"","lat":51.198,"lon":0.087,"icon":"/images/4/4c/m_nuclear-monitoring-posts.png"},{"text":"\u003Cb\u003E\u003Cdiv class=\"mw-parser-output\"\u003E\u003Cp\u003E\u003Ca href=\"/eastchurch-roc-post\" title=\"eastchurch-roc-post\"\u003EEastchurch ROC Post\u003C/a\u003E\u003C/b\u003E\u003Cdiv class=\"mw-parser-output\"\u003E\u003Cp\u003E\u003Ca href=\"/Category:nuclear-monitoring-posts\" title=\"Category:nuclear-monitoring-posts\"\u003ENuclear Monitoring Posts\u003C/a\u003E\n\u003C/p\u003E\u003C/div\u003E","title":"Eastchurch ROC Post@Nuclear Monitoring Posts\n","link":"","lat":51.402,"lon":0.864,"icon":"/images/4/4c/m_nuclear-monitoring-posts.png"},{"text":"\u003Cb\u003E\u003Cdiv class=\"mw-parser-output\"\u003E\u003Cp\u003E\u003Ca href=\"/cranbrook-roc-post\" title=\"cranbrook-roc-post\"\u003ECranbrook ROC Post\u003C/a\u003E\u003C/b\u003E\u003Cdiv class=\"mw-parser-output\"\u003E\u003Cp\u003E\u003Ca href=\"/Category:nuclear-monitoring-posts\" title=\"Category:nuclear-monitoring-posts\"\u003ENuclear Monitoring Posts\u003C/a\u003E\n\u003C/p\u003E\u003C/div\u003E","title":"Cranbrook ROC Post@Nuclear Monitoring Posts\n","link":"","lat":51.091,"lon":0.516,"icon":"/images/4/4c/m_nuclear-monitoring-posts.png"},{"text":"\u003Cb\u003E\u003Cdiv class=\"mw-parser-output\"\u003E\u003Cp\u003E\u003Ca href=\"/cliffe-roc-post\" title=\"cliffe-roc-post\"\u003ECliffe ROC Post\u003C/a\u003E\u003C/b\u003E\u003Cdiv class=\"mw-parser-output\"\u003E\u003Cp\u003E\u003Ca href=\"/Category:nuclear-monitoring-posts\" title=\"Category:nuclear-monitoring-posts\"\u003ENuclear Monitoring Posts\u003C/a\u003E\n\u003C/p\u003E\u003C/div\u003E","title":"Cliffe ROC Post@Nuclear Monitoring Posts\n","link":"","lat":51.461,"lon":0.492,"icon":"/images/4/4c/m_nuclear-monitoring-posts.png"},{"text":"\u003Cb\u003E\u003Cdiv class=\"mw-parser-output\"\u003E\u003Cp\u003E\u003Ca href=\"/borough-green-roc-post\" title=\"borough-green-roc-post\"\u003EBorough Green ROC Post\u003C/a\u003E\u003C/b\u003E\u003Cdiv class=\"mw-parser-output\"\u003E\u003Cp\u003E\u003Ca href=\"/Category:nuclear-monitoring-posts\" title=\"Category:nuclear-monitoring-posts\"\u003ENuclear Monitoring Posts\u003C/a\u003E\n\u003C/p\u003E\u003C/div\u003E","title":"Borough Green ROC Post@Nuclear Monitoring Posts\n","link":"","lat":51.292,"lon":0.312,"icon":"/images/4/4c/m_nuclear-monitoring-posts.png"},{"text":"\u003Cb\u003E\u003Cdiv class=\"mw-parser-output\"\u003E\u003Cp\u003E\u003Ca href=\"/bethersden-roc-post\" title=\"bethersden-roc-post\"\u003EBethersden ROC Post\u003C/a\u003E\u003C/b\u003E\u003Cdiv class=\"mw-parser-output\"\u003E\u003Cp\u003E\u003Ca href=\"/Category:nuclear-monitoring-posts\" title=\"Category:nuclear-monitoring-posts\"\u003ENuclear Monitoring Posts\u003C/a\u003E\n\u003C/p\u003E\u003C/div\u003E","title":"Bethersden ROC Post@Nuclear Monitoring Posts\n","link":"","lat":51.132,"lon":0.756,"icon":"/images/4/4c/m_nuclear-monitoring-posts.png"},{"text":"\u003Cb\u003E\u003Cdiv class=\"mw-parser-output\"\u003E\u003Cp\u003E\u003Ca href=\"/allhallows-roc-post\" title=\"allhallows-roc-post\"\u003EAllhallows ROC Post\u003C/a\u003E\u003C/b\u003E\u003Cdiv class=\"mw-parser-output\"\u003E\u003Cp\u003E\u003Ca href=\"/Category:nuclear-monitoring-posts\" title=\"Category:nuclear-monitoring-posts\"\u003ENuclear Monitoring Posts\u003C/a\u003E\n\u003C/p\u003E\u003C/div\u003E","title":"Allhallows ROC Post@Nuclear Monitoring Posts\n","link":"","lat":51.469,"lon":0.637,"icon":"/images/4/4c/m_nuclear-monitoring-posts.png"},{"text":"\u003Cb\u003E\u003Cdiv class=\"mw-parser-output\"\u003E\u003Cp\u003E\u003Ca href=\"/fort-pitt\" title=\"fort-pitt\"\u003EFort Pitt\u003C/a\u003E\u003C/b\u003E\u003Cdiv class=\"mw-parser-output\"\u003E\u003Cp\u003E\u003Ca href=\"/Category:civil-defence\" title=\"Category:civil-defence\"\u003ECivil Defence\u003C/a\u003E, \u003Ca href=\"/Category:military-land\" title=\"Category:military-land\"\u003EMilitary - Land\u003C/a\u003E\n\u003C/p\u003E\u003C/div\u003E","title":"Fort Pitt@Civil Defence, Military - Land\n","link":"","lat":51.382,"lon":0.514,"icon":"/images/c/c5/m_civil-defence.png"},{"text":"\u003Cb\u003E\u003Cdiv class=\"mw-parser-output\"\u003E\u003Cp\u003E\u003Ca href=\"/st-matthews-school-air-raid-shelter\" title=\"st-matthews-school-air-raid-shelter\"\u003ESt Matthews School Air Raid Shelter\u003C/a\u003E\u003C/b\u003E\u003Cdiv class=\"mw-parser-output\"\u003E\u003Cp\u003E\u003Ca href=\"/Category:civil-defence\" title=\"Category:civil-defence\"\u003ECivil Defence\u003C/a\u003E, \u003Ca href=\"/Category:places-to-visit\" title=\"Category:places-to-visit\"\u003EPlaces To Visit\u003C/a\u003E\n\u003C/p\u003E\u003C/div\u003E","title":"St Matthews School Air Raid Shelter@Civil Defence, Places To Visit\n","link":"","lat":51.153,"lon":0.271,"icon":"/images/3/3e/v_civil-defence.png"},{"text":"\u003Cb\u003E\u003Cdiv class=\"mw-parser-output\"\u003E\u003Cp\u003E\u003Ca href=\"/civil-defence-control-centre-gravesend\" title=\"civil-defence-control-centre-gravesend\"\u003ECivil Defence Control Centre Gravesend\u003C/a\u003E\u003C/b\u003E\u003Cdiv class=\"mw-parser-output\"\u003E\u003Cp\u003E\u003Ca href=\"/Category:military-intelligence-and-communication\" title=\"Category:military-intelligence-and-communication\"\u003EMilitary - Intelligence and Communication\u003C/a\u003E, \u003Ca href=\"/Category:places-to-visit\" title=\"Category:places-to-visit\"\u003EPlaces To Visit\u003C/a\u003E\n\u003C/p\u003E\u003C/div\u003E","title":"Civil Defence Control Centre Gravesend@Military - Intelligence and Communication, Places To Visit\n","link":"","lat":51.431,"lon":0.364,"icon":"/images/6/63/v_military-intelligence-and-communication.png"},{"text":"\u003Cb\u003E\u003Cdiv class=\"mw-parser-output\"\u003E\u003Cp\u003E\u003Ca href=\"/stoke-school-wartime-shelter\" title=\"stoke-school-wartime-shelter\"\u003EStoke School Wartime Shelter\u003C/a\u003E\u003C/b\u003E\u003Cdiv class=\"mw-parser-output\"\u003E\u003Cp\u003E\u003Ca href=\"/Category:civil-defence\" title=\"Category:civil-defence\"\u003ECivil Defence\u003C/a\u003E\n\u003C/p\u003E\u003C/div\u003E","title":"Stoke School Wartime Shelter@Civil Defence\n","link":"","lat":51.456,"lon":0.635,"icon":"/images/c/c5/m_civil-defence.png"},{"text":"\u003Cb\u003E\u003Cdiv class=\"mw-parser-output\"\u003E\u003Cp\u003E\u003Ca href=\"/eastchurch-airfield-battle-hq\" title=\"eastchurch-airfield-battle-hq\"\u003EEastchurch Airfield Battle HQ\u003C/a\u003E\u003C/b\u003E\u003Cdiv class=\"mw-parser-output\"\u003E\u003Cp\u003E\u003Ca href=\"/Category:military-air\" title=\"Category:military-air\"\u003EMilitary - Air\u003C/a\u003E\n\u003C/p\u003E\u003C/div\u003E","title":"Eastchurch Airfield Battle HQ@Military - Air\n","link":"","lat":51.396,"lon":0.846,"icon":"/images/4/4e/m_military-air.png"},{"text":"\u003Cb\u003E\u003Cdiv class=\"mw-parser-output\"\u003E\u003Cp\u003E\u003Ca href=\"/hosey-common-stone-quarry\" title=\"hosey-common-stone-quarry\"\u003EHosey Common Stone Quarry\u003C/a\u003E\u003C/b\u003E\u003Cdiv class=\"mw-parser-output\"\u003E\u003Cp\u003E\u003Ca href=\"/Category:mines\" title=\"Category:mines\"\u003EMines\u003C/a\u003E\n\u003C/p\u003E\u003C/div\u003E","title":"Hosey Common Stone Quarry@Mines\n","link":"","lat":51.256,"lon":0.084,"icon":"/images/a/ae/m_mines.png"},{"text":"\u003Cb\u003E\u003Cdiv class=\"mw-parser-output\"\u003E\u003Cp\u003E\u003Ca href=\"/west-malling-airfield-battle-hq\" title=\"west-malling-airfield-battle-hq\"\u003EWest Malling Airfield Battle HQ\u003C/a\u003E\u003C/b\u003E\u003Cdiv class=\"mw-parser-output\"\u003E\u003Cp\u003E\u003Ca href=\"/Category:military-air\" title=\"Category:military-air\"\u003EMilitary - Air\u003C/a\u003E\n\u003C/p\u003E\u003C/div\u003E","title":"West Malling Airfield Battle HQ@Military - Air\n","link":"","lat":51.265,"lon":0.402,"icon":"/images/4/4e/m_military-air.png"},{"text":"\u003Cb\u003E\u003Cdiv class=\"mw-parser-output\"\u003E\u003Cp\u003E\u003Ca href=\"/detling-airfield-battle-hq\" title=\"detling-airfield-battle-hq\"\u003EDetling Airfield Battle HQ\u003C/a\u003E\u003C/b\u003E\u003Cdiv class=\"mw-parser-output\"\u003E\u003Cp\u003E\u003Ca href=\"/Category:military-air\" title=\"Category:military-air\"\u003EMilitary - Air\u003C/a\u003E\n\u003C/p\u003E\u003C/div\u003E","title":"Detling Airfield Battle HQ@Military - Air\n","link":"","lat":51.311,"lon":0.608,"icon":"/images/4/4e/m_military-air.png"},{"text":"\u003Cb\u003E\u003Cdiv class=\"mw-parser-output\"\u003E\u003Cp\u003E\u003Ca href=\"/grove-tunnel\" title=\"grove-tunnel\"\u003EGrove Tunnel\u003C/a\u003E\u003C/b\u003E\u003Cdiv class=\"mw-parser-output\"\u003E\u003Cp\u003E\u003Ca href=\"/Category:transport\" title=\"Category:transport\"\u003ETransport\u003C/a\u003E\n\u003C/p\u003E\u003C/div\u003E","title":"Grove Tunnel@Transport\n","link":"","lat":51.123,"lon":0.258,"icon":"/images/5/57/m_transport.png"},{"text":"\u003Cb\u003E\u003Cdiv class=\"mw-parser-output\"\u003E\u003Cp\u003E\u003Ca href=\"/sheerness-rnxs-emergency-port-control\" title=\"sheerness-rnxs-emergency-port-control\"\u003ESheerness RNXS Emergency Port Control\u003C/a\u003E\u003C/b\u003E\u003Cdiv class=\"mw-parser-output\"\u003E\u003Cp\u003E\u003Ca href=\"/Category:military-sea\" title=\"Category:military-sea\"\u003EMilitary - Sea\u003C/a\u003E, \u003Ca href=\"/Category:nuclear-bunkers\" title=\"Category:nuclear-bunkers\"\u003ENuclear Bunkers\u003C/a\u003E\n\u003C/p\u003E\u003C/div\u003E","title":"Sheerness RNXS Emergency Port Control@Military - Sea, Nuclear Bunkers\n","link":"","lat":51.447,"lon":0.745,"icon":"/images/6/6b/m_military-sea.png"},{"text":"\u003Cb\u003E\u003Cdiv class=\"mw-parser-output\"\u003E\u003Cp\u003E\u003Ca href=\"/queenborough-sub-control\" title=\"queenborough-sub-control\"\u003EQueenborough Sub Control\u003C/a\u003E\u003C/b\u003E\u003Cdiv class=\"mw-parser-output\"\u003E\u003Cp\u003E\u003Ca href=\"/Category:government-local\" title=\"Category:government-local\"\u003EGovernment - Local\u003C/a\u003E, \u003Ca href=\"/Category:nuclear-bunkers\" title=\"Category:nuclear-bunkers\"\u003ENuclear Bunkers\u003C/a\u003E\n\u003C/p\u003E\u003C/div\u003E","title":"Queenborough Sub Control@Government - Local, Nuclear Bunkers\n","link":"","lat":51.418,"lon":0.741,"icon":"/images/3/32/m_government-local.png"},{"text":"\u003Cb\u003E\u003Cdiv class=\"mw-parser-output\"\u003E\u003Cp\u003E\u003Ca href=\"/tunbridge-wells-regional-war-room\" title=\"tunbridge-wells-regional-war-room\"\u003ETunbridge Wells Regional War Room\u003C/a\u003E\u003C/b\u003E\u003Cdiv class=\"mw-parser-output\"\u003E\u003Cp\u003E\u003Ca href=\"/Category:government-national-and-regional\" title=\"Category:government-national-and-regional\"\u003EGovernment - National and Regional\u003C/a\u003E, \u003Ca href=\"/Category:nuclear-bunkers\" title=\"Category:nuclear-bunkers\"\u003ENuclear Bunkers\u003C/a\u003E\n\u003C/p\u003E\u003C/div\u003E","title":"Tunbridge Wells Regional War Room@Government - National and Regional, Nuclear Bunkers\n","link":"","lat":51.126,"lon":0.279,"icon":"/images/d/d7/m_government-national-and-regional.png"},{"text":"\u003Cb\u003E\u003Cdiv class=\"mw-parser-output\"\u003E\u003Cp\u003E\u003Ca href=\"/maidstone-springfields-kent-county-emergency-centre\" title=\"maidstone-springfields-kent-county-emergency-centre\"\u003EMaidstone Springfields Kent County Emergency Centre\u003C/a\u003E\u003C/b\u003E\u003Cdiv class=\"mw-parser-output\"\u003E\u003Cp\u003E\u003Ca href=\"/Category:government-local\" title=\"Category:government-local\"\u003EGovernment - Local\u003C/a\u003E, \u003Ca href=\"/Category:nuclear-bunkers\" title=\"Category:nuclear-bunkers\"\u003ENuclear Bunkers\u003C/a\u003E\n\u003C/p\u003E\u003C/div\u003E","title":"Maidstone Springfields Kent County Emergency Centre@Government - Local, Nuclear Bunkers\n","link":"","lat":51.285,"lon":0.516,"icon":"/images/3/32/m_government-local.png"},{"text":"\u003Cb\u003E\u003Cdiv class=\"mw-parser-output\"\u003E\u003Cp\u003E\u003Ca href=\"/gillingham-borough-control\" title=\"gillingham-borough-control\"\u003EGillingham Borough Control\u003C/a\u003E\u003C/b\u003E\u003Cdiv class=\"mw-parser-output\"\u003E\u003Cp\u003E\u003Ca href=\"/Category:government-local\" title=\"Category:government-local\"\u003EGovernment - Local\u003C/a\u003E, \u003Ca href=\"/Category:nuclear-bunkers\" title=\"Category:nuclear-bunkers\"\u003ENuclear Bunkers\u003C/a\u003E\n\u003C/p\u003E\u003C/div\u003E","title":"Gillingham Borough Control@Government - Local, Nuclear Bunkers\n","link":"","lat":51.376,"lon":0.553,"icon":"/images/3/32/m_government-local.png"},{"text":"\u003Cb\u003E\u003Cdiv class=\"mw-parser-output\"\u003E\u003Cp\u003E\u003Ca href=\"/dartford-emergency-centre\" title=\"dartford-emergency-centre\"\u003EDartford Emergency Centre\u003C/a\u003E\u003C/b\u003E\u003Cdiv class=\"mw-parser-output\"\u003E\u003Cp\u003E\u003Ca href=\"/Category:government-local\" title=\"Category:government-local\"\u003EGovernment - Local\u003C/a\u003E, \u003Ca href=\"/Category:nuclear-bunkers\" title=\"Category:nuclear-bunkers\"\u003ENuclear Bunkers\u003C/a\u003E\n\u003C/p\u003E\u003C/div\u003E","title":"Dartford Emergency Centre@Government - Local, Nuclear Bunkers\n","link":"","lat":51.447,"lon":0.219,"icon":"/images/3/32/m_government-local.png"},{"text":"\u003Cb\u003E\u003Cdiv class=\"mw-parser-output\"\u003E\u003Cp\u003E\u003Ca href=\"/grain-tower\" title=\"grain-tower\"\u003EGrain Tower\u003C/a\u003E\u003C/b\u003E\u003Cdiv class=\"mw-parser-output\"\u003E\u003Cp\u003E\u003Ca href=\"/Category:military-land\" title=\"Category:military-land\"\u003EMilitary - Land\u003C/a\u003E\n\u003C/p\u003E\u003C/div\u003E","title":"Grain Tower@Military - Land\n","link":"","lat":51.451,"lon":0.73,"icon":"/images/2/2c/m_military-land.png"},{"text":"\u003Cb\u003E\u003Cdiv class=\"mw-parser-output\"\u003E\u003Cp\u003E\u003Ca href=\"/darenth-wood-dene-hole\" title=\"darenth-wood-dene-hole\"\u003EDarenth Wood Dene Hole\u003C/a\u003E\u003C/b\u003E\u003Cdiv class=\"mw-parser-output\"\u003E\u003Cp\u003E\u003Ca href=\"/Category:mines\" title=\"Category:mines\"\u003EMines\u003C/a\u003E\n\u003C/p\u003E\u003C/div\u003E","title":"Darenth Wood Dene Hole@Mines\n","link":"","lat":51.43,"lon":0.267,"icon":"/images/a/ae/m_mines.png"},{"text":"\u003Cb\u003E\u003Cdiv class=\"mw-parser-output\"\u003E\u003Cp\u003E\u003Ca href=\"/wateringbury-roc-post\" title=\"wateringbury-roc-post\"\u003EWateringbury ROC Post\u003C/a\u003E\u003C/b\u003E\u003Cdiv class=\"mw-parser-output\"\u003E\u003Cp\u003E\u003Ca href=\"/Category:nuclear-monitoring-posts\" title=\"Category:nuclear-monitoring-posts\"\u003ENuclear Monitoring Posts\u003C/a\u003E\n\u003C/p\u003E\u003C/div\u003E","title":"Wateringbury ROC Post@Nuclear Monitoring Posts\n","link":"","lat":51.246,"lon":0.4,"icon":"/images/4/4c/m_nuclear-monitoring-posts.png"},{"text":"\u003Cb\u003E\u003Cdiv class=\"mw-parser-output\"\u003E\u003Cp\u003E\u003Ca href=\"/snodland-roc-post\" title=\"snodland-roc-post\"\u003ESnodland ROC Post\u003C/a\u003E\u003C/b\u003E\u003Cdiv class=\"mw-parser-output\"\u003E\u003Cp\u003E\u003Ca href=\"/Category:nuclear-monitoring-posts\" title=\"Category:nuclear-monitoring-posts\"\u003ENuclear Monitoring Posts\u003C/a\u003E\n\u003C/p\u003E\u003C/div\u003E","title":"Snodland ROC Post@Nuclear Monitoring Posts\n","link":"","lat":51.323,"lon":0.432,"icon":"/images/4/4c/m_nuclear-monitoring-posts.png"},{"text":"\u003Cb\u003E\u003Cdiv class=\"mw-parser-output\"\u003E\u003Cp\u003E\u003Ca href=\"/sheldwich-lees-roc-post\" title=\"sheldwich-lees-roc-post\"\u003ESheldwich Lees ROC Post\u003C/a\u003E\u003C/b\u003E\u003Cdiv class=\"mw-parser-output\"\u003E\u003Cp\u003E\u003Ca href=\"/Category:nuclear-monitoring-posts\" title=\"Category:nuclear-monitoring-posts\"\u003ENuclear Monitoring Posts\u003C/a\u003E\n\u003C/p\u003E\u003C/div\u003E","title":"Sheldwich Lees ROC Post@Nuclear Monitoring Posts\n","link":"","lat":51.282,"lon":0.889,"icon":"/images/4/4c/m_nuclear-monitoring-posts.png"},{"text":"\u003Cb\u003E\u003Cdiv class=\"mw-parser-output\"\u003E\u003Cp\u003E\u003Ca href=\"/sheerness-roc-post\" title=\"sheerness-roc-post\"\u003ESheerness ROC Post\u003C/a\u003E\u003C/b\u003E\u003Cdiv class=\"mw-parser-output\"\u003E\u003Cp\u003E\u003Ca href=\"/Category:nuclear-monitoring-posts\" title=\"Category:nuclear-monitoring-posts\"\u003ENuclear Monitoring Posts\u003C/a\u003E\n\u003C/p\u003E\u003C/div\u003E","title":"Sheerness ROC Post@Nuclear Monitoring Posts\n","link":"","lat":51.413,"lon":0.769,"icon":"/images/4/4c/m_nuclear-monitoring-posts.png"},{"text":"\u003Cb\u003E\u003Cdiv class=\"mw-parser-output\"\u003E\u003Cp\u003E\u003Ca href=\"/oare-roc-post\" title=\"oare-roc-post\"\u003EOare ROC Post\u003C/a\u003E\u003C/b\u003E\u003Cdiv class=\"mw-parser-output\"\u003E\u003Cp\u003E\u003Ca href=\"/Category:nuclear-monitoring-posts\" title=\"Category:nuclear-monitoring-posts\"\u003ENuclear Monitoring Posts\u003C/a\u003E\n\u003C/p\u003E\u003C/div\u003E","title":"Oare ROC Post@Nuclear Monitoring Posts\n","link":"","lat":51.329,"lon":0.872,"icon":"/images/4/4c/m_nuclear-monitoring-posts.png"},{"text":"\u003Cb\u003E\u003Cdiv class=\"mw-parser-output\"\u003E\u003Cp\u003E\u003Ca href=\"/lenham-roc-post\" title=\"lenham-roc-post\"\u003ELenham ROC Post\u003C/a\u003E\u003C/b\u003E\u003Cdiv class=\"mw-parser-output\"\u003E\u003Cp\u003E\u003Ca href=\"/Category:nuclear-monitoring-posts\" title=\"Category:nuclear-monitoring-posts\"\u003ENuclear Monitoring Posts\u003C/a\u003E\n\u003C/p\u003E\u003C/div\u003E","title":"Lenham ROC Post@Nuclear Monitoring Posts\n","link":"","lat":51.251,"lon":0.724,"icon":"/images/4/4c/m_nuclear-monitoring-posts.png"},{"text":"\u003Cb\u003E\u003Cdiv class=\"mw-parser-output\"\u003E\u003Cp\u003E\u003Ca href=\"/horsmonden-roc-post\" title=\"horsmonden-roc-post\"\u003EHorsmonden ROC Post\u003C/a\u003E\u003C/b\u003E\u003Cdiv class=\"mw-parser-output\"\u003E\u003Cp\u003E\u003Ca href=\"/Category:nuclear-monitoring-posts\" title=\"Category:nuclear-monitoring-posts\"\u003ENuclear Monitoring Posts\u003C/a\u003E\n\u003C/p\u003E\u003C/div\u003E","title":"Horsmonden ROC Post@Nuclear Monitoring Posts\n","link":"","lat":51.121,"lon":0.425,"icon":"/images/4/4c/m_nuclear-monitoring-posts.png"},{"text":"\u003Cb\u003E\u003Cdiv class=\"mw-parser-output\"\u003E\u003Cp\u003E\u003Ca href=\"/headcorn-roc-post\" title=\"headcorn-roc-post\"\u003EHeadcorn ROC Post\u003C/a\u003E\u003C/b\u003E\u003Cdiv class=\"mw-parser-output\"\u003E\u003Cp\u003E\u003Ca href=\"/Category:nuclear-monitoring-posts\" title=\"Category:nuclear-monitoring-posts\"\u003ENuclear Monitoring Posts\u003C/a\u003E\n\u003C/p\u003E\u003C/div\u003E","title":"Headcorn ROC Post@Nuclear Monitoring Posts\n","link":"","lat":51.171,"lon":0.616,"icon":"/images/4/4c/m_nuclear-monitoring-posts.png"},{"text":"\u003Cb\u003E\u003Cdiv class=\"mw-parser-output\"\u003E\u003Cp\u003E\u003Ca href=\"/greenhithe-roc-post\" title=\"greenhithe-roc-post\"\u003EGreenhithe ROC Post\u003C/a\u003E\u003C/b\u003E\u003Cdiv class=\"mw-parser-output\"\u003E\u003Cp\u003E\u003Ca href=\"/Category:nuclear-monitoring-posts\" title=\"Category:nuclear-monitoring-posts\"\u003ENuclear Monitoring Posts\u003C/a\u003E\n\u003C/p\u003E\u003C/div\u003E","title":"Greenhithe ROC Post@Nuclear Monitoring Posts\n","link":"","lat":51.437,"lon":0.312,"icon":"/images/4/4c/m_nuclear-monitoring-posts.png"},{"text":"\u003Cb\u003E\u003Cdiv class=\"mw-parser-output\"\u003E\u003Cp\u003E\u003Ca href=\"/brasted-roc-post\" title=\"brasted-roc-post\"\u003EBrasted ROC Post\u003C/a\u003E\u003C/b\u003E\u003Cdiv class=\"mw-parser-output\"\u003E\u003Cp\u003E\u003Ca href=\"/Category:nuclear-monitoring-posts\" title=\"Category:nuclear-monitoring-posts\"\u003ENuclear Monitoring Posts\u003C/a\u003E\n\u003C/p\u003E\u003C/div\u003E","title":"Brasted ROC Post@Nuclear Monitoring Posts\n","link":"","lat":51.29,"lon":0.106,"icon":"/images/4/4c/m_nuclear-monitoring-posts.png"},{"text":"\u003Cb\u003E\u003Cdiv class=\"mw-parser-output\"\u003E\u003Cp\u003E\u003Ca href=\"/bearsted-roc-post\" title=\"bearsted-roc-post\"\u003EBearsted ROC Post\u003C/a\u003E\u003C/b\u003E\u003Cdiv class=\"mw-parser-output\"\u003E\u003Cp\u003E\u003Ca href=\"/Category:nuclear-monitoring-posts\" title=\"Category:nuclear-monitoring-posts\"\u003ENuclear Monitoring Posts\u003C/a\u003E\n\u003C/p\u003E\u003C/div\u003E","title":"Bearsted ROC Post@Nuclear Monitoring Posts\n","link":"","lat":51.275,"lon":0.573,"icon":"/images/4/4c/m_nuclear-monitoring-posts.png"},{"text":"\u003Cb\u003E\u003Cdiv class=\"mw-parser-output\"\u003E\u003Cp\u003E\u003Ca href=\"/fort-bridgewoods-aaor\" title=\"fort-bridgewoods-aaor\"\u003EFort Bridgewoods AAOR\u003C/a\u003E\u003C/b\u003E\u003Cdiv class=\"mw-parser-output\"\u003E\u003Cp\u003E\u003Ca href=\"/Category:military-land\" title=\"Category:military-land\"\u003EMilitary - Land\u003C/a\u003E, \u003Ca href=\"/Category:nuclear-bunkers\" title=\"Category:nuclear-bunkers\"\u003ENuclear Bunkers\u003C/a\u003E\n\u003C/p\u003E\u003C/div\u003E","title":"Fort Bridgewoods AAOR@Military - Land, Nuclear Bunkers\n","link":"","lat":51.36,"lon":0.494,"icon":"/images/2/2c/m_military-land.png"},{"text":"\u003Cb\u003E\u003Cdiv class=\"mw-parser-output\"\u003E\u003Cp\u003E\u003Ca href=\"/lullingstone-castle-ice-house\" title=\"lullingstone-castle-ice-house\"\u003ELullingstone Castle Ice House\u003C/a\u003E\u003C/b\u003E\u003Cdiv class=\"mw-parser-output\"\u003E\u003Cp\u003E\u003Ca href=\"/Category:ice-wells\" title=\"Category:ice-wells\"\u003EIce Wells\u003C/a\u003E\n\u003C/p\u003E\u003C/div\u003E","title":"Lullingstone Castle Ice House@Ice Wells\n","link":"","lat":51.357,"lon":0.198,"icon":"/images/d/d4/m_ice-wells.png"},{"text":"\u003Cb\u003E\u003Cdiv class=\"mw-parser-output\"\u003E\u003Cp\u003E\u003Ca href=\"/chatham-dockyard-commissioners-house\" title=\"chatham-dockyard-commissioners-house\"\u003EChatham Dockyard Commissioner's House Ice House\u003C/a\u003E\u003C/b\u003E\u003Cdiv class=\"mw-parser-output\"\u003E\u003Cp\u003E\u003Ca href=\"/Category:ice-wells\" title=\"Category:ice-wells\"\u003EIce Wells\u003C/a\u003E\n\u003C/p\u003E\u003C/div\u003E","title":"Chatham Dockyard Commissioner's House Ice House@Ice Wells\n","link":"","lat":51.394,"lon":0.527,"icon":"/images/d/d4/m_ice-wells.png"},{"text":"\u003Cb\u003E\u003Cdiv class=\"mw-parser-output\"\u003E\u003Cp\u003E\u003Ca href=\"/knole-house-ice-well\" title=\"knole-house-ice-well\"\u003EKnole House Ice Well\u003C/a\u003E\u003C/b\u003E\u003Cdiv class=\"mw-parser-output\"\u003E\u003Cp\u003E\u003Ca href=\"/Category:ice-wells\" title=\"Category:ice-wells\"\u003EIce Wells\u003C/a\u003E\n\u003C/p\u003E\u003C/div\u003E","title":"Knole House Ice Well@Ice Wells\n","link":"","lat":51.266,"lon":0.206,"icon":"/images/d/d4/m_ice-wells.png"},{"text":"\u003Cb\u003E\u003Cdiv class=\"mw-parser-output\"\u003E\u003Cp\u003E\u003Ca href=\"/hms-wildfire\" title=\"hms-wildfire\"\u003EHMS Wildfire\u003C/a\u003E\u003C/b\u003E\u003Cdiv class=\"mw-parser-output\"\u003E\u003Cp\u003E\u003Ca href=\"/Category:military-sea\" title=\"Category:military-sea\"\u003EMilitary - Sea\u003C/a\u003E, \u003Ca href=\"/Category:military-air\" title=\"Category:military-air\"\u003EMilitary - Air\u003C/a\u003E\n\u003C/p\u003E\u003C/div\u003E","title":"HMS Wildfire@Military - Sea, Military - Air\n","link":"","lat":51.395,"lon":0.544,"icon":"/images/6/6b/m_military-sea.png"},{"text":"\u003Cb\u003E\u003Cdiv class=\"mw-parser-output\"\u003E\u003Cp\u003E\u003Ca href=\"/hoo-roc-post\" title=\"hoo-roc-post\"\u003EHoo ROC Post\u003C/a\u003E\u003C/b\u003E\u003Cdiv class=\"mw-parser-output\"\u003E\u003Cp\u003E\u003Ca href=\"/Category:nuclear-monitoring-posts\" title=\"Category:nuclear-monitoring-posts\"\u003ENuclear Monitoring Posts\u003C/a\u003E\n\u003C/p\u003E\u003C/div\u003E","title":"Hoo ROC Post@Nuclear Monitoring Posts\n","link":"","lat":51.432,"lon":0.557,"icon":"/images/4/4c/m_nuclear-monitoring-posts.png"},{"text":"\u003Cb\u003E\u003Cdiv class=\"mw-parser-output\"\u003E\u003Cp\u003E\u003Ca href=\"/fort-amherst\" title=\"fort-amherst\"\u003EFort Amherst\u003C/a\u003E\u003C/b\u003E\u003Cdiv class=\"mw-parser-output\"\u003E\u003Cp\u003E\u003Ca href=\"/Category:military-land\" title=\"Category:military-land\"\u003EMilitary - Land\u003C/a\u003E, \u003Ca href=\"/Category:places-to-visit\" title=\"Category:places-to-visit\"\u003EPlaces To Visit\u003C/a\u003E\n\u003C/p\u003E\u003C/div\u003E","title":"Fort Amherst@Military - Land, Places To Visit\n","link":"","lat":51.387,"lon":0.525,"icon":"/images/5/5a/v_military-land.png"},{"text":"\u003Cb\u003E\u003Cdiv class=\"mw-parser-output\"\u003E\u003Cp\u003E\u003Ca class=\"mw-selflink selflink\"\u003EMaidstone ROC Group HQ\u003C/a\u003E\u003C/b\u003E\u003Cdiv class=\"mw-parser-output\"\u003E\u003Cp\u003E\u003Ca href=\"/Category:military-air\" title=\"Category:military-air\"\u003EMilitary - Air\u003C/a\u003E, \u003Ca href=\"/Category:nuclear-bunkers\" title=\"Category:nuclear-bunkers\"\u003ENuclear Bunkers\u003C/a\u003E\n\u003C/p\u003E\u003C/div\u003E","title":"Maidstone ROC Group HQ@Military - Air, Nuclear Bunkers\n","link":"","lat":51.277,"lon":0.508,"icon":"/images/d/d2/Red-marker.png"},{"text":"\u003Cb\u003E\u003Cdiv class=\"mw-parser-output\"\u003E\u003Cp\u003E\u003Ca href=\"/george-vaults-rochester\" title=\"george-vaults-rochester\"\u003EGeorge Vaults Rochester\u003C/a\u003E\u003C/b\u003E\u003Cdiv class=\"mw-parser-output\"\u003E\u003Cp\u003E\u003Ca href=\"/Category:factories-and-storage\" title=\"Category:factories-and-storage\"\u003EFactories and Storage\u003C/a\u003E, \u003Ca href=\"/Category:places-to-visit\" title=\"Category:places-to-visit\"\u003EPlaces To Visit\u003C/a\u003E\n\u003C/p\u003E\u003C/div\u003E","title":"George Vaults Rochester@Factories and Storage, Places To Visit\n","link":"","lat":51.39,"lon":0.503,"icon":"/images/2/25/v_factories-and-storage.png"},{"text":"\u003Cb\u003E\u003Cdiv class=\"mw-parser-output\"\u003E\u003Cp\u003E\u003Ca href=\"/tonbridge-slade-school-air-raid-shelter\" title=\"tonbridge-slade-school-air-raid-shelter\"\u003ETonbridge Slade School Air Raid Shelter\u003C/a\u003E\u003C/b\u003E\u003Cdiv class=\"mw-parser-output\"\u003E\u003Cp\u003E\u003Ca href=\"/Category:civil-defence\" title=\"Category:civil-defence\"\u003ECivil Defence\u003C/a\u003E\n\u003C/p\u003E\u003C/div\u003E","title":"Tonbridge Slade School Air Raid Shelter@Civil Defence\n","link":"","lat":51.197,"lon":0.271,"icon":"/images/c/c5/m_civil-defence.png"},{"text":"\u003Cb\u003E\u003Cdiv class=\"mw-parser-output\"\u003E\u003Cp\u003E\u003Ca href=\"/rochester-shorts-brothers-factory-and-public-air-raid-shelter\" title=\"rochester-shorts-brothers-factory-and-public-air-raid-shelter\"\u003ERochester Shorts Brothers Factory and Public Air Raid Shelter\u003C/a\u003E\u003C/b\u003E\u003Cdiv class=\"mw-parser-output\"\u003E\u003Cp\u003E\u003Ca href=\"/Category:civil-defence\" title=\"Category:civil-defence\"\u003ECivil Defence\u003C/a\u003E, \u003Ca href=\"/Category:factories-and-storage\" title=\"Category:factories-and-storage\"\u003EFactories and Storage\u003C/a\u003E\n\u003C/p\u003E\u003C/div\u003E","title":"Rochester Shorts Brothers Factory and Public Air Raid Shelter@Civil Defence, Factories and Storage\n","link":"","lat":51.384,"lon":0.498,"icon":"/images/c/c5/m_civil-defence.png"}],"imageoverlays":null}
 Subterranea 26 article
 Subterranea 40 article
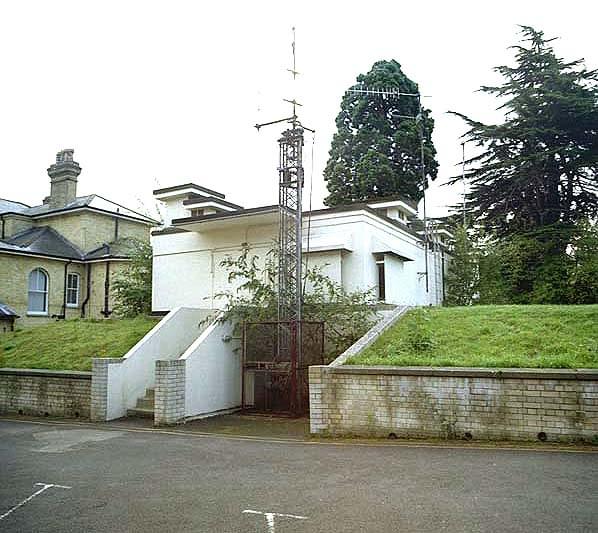 The 'Aztec' Temple with Ashmore house to the left (Nick Catford)
 The plant room (Nick Catford)
 The control room (Nick Catford)
 19 Group Control at Beckenham (Roger Starling)
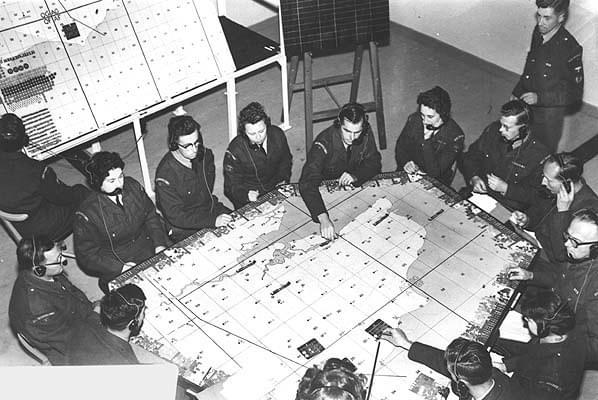 The control room shortly after opening ()